
This is part 3 of the Basics of Python in Power BI series and builds on from the previous post about Python dataframes. In this post we show you how to import files from a folder using Python. Combining files from a folder is currently an easy process in Power Query, but I mentioned in my first post that I am interested in the re-use of existing Python scripts.
For readability, I am switching between Spyder and JupyterLab, depending on what I need to show. I’ll also cover some foundation concepts so that an understanding is gained, rather than just an answer. Three concepts are covered in this post: working with files using the operating system (os) package, working with lists and a bit more dataframe functionality.
Working with files in Python
Python has a built-in os (operating system) library. This gives us access to methods such as getcwd (get current working directory), chdir (change directory) and listdir (list directory).

While getcwd returns the current working directory (or current path), chdir changes the path to the newly specified one and this becomes the current working directory. When we use listdir with a path, it only returns the list of files in that path, but does not change the current working directory.
Lists
The listdir method returns the result as a Python list data structure. The outputs 4 and 5 above can be identified as lists because they are enclosed in square brackets and items are comma separated. The items in the lists in these results are all of data type string. When lists have the same data types the items are referred to as homogeneous. A list can even hold items of a mix of data types (heterogeneous).
The items in a list are indexed starting at 0. We can either find the content by providing an index, or we can find the index of the first occurrence of an item.

We are even able to change the content (mutable) of the list item by specifying the index, as seen above (that index position must already exist).
We can iterate over the items in a list using a for loop construct.

The syntax is equivalent to saying “for i = 0 to 3 multiply each item by 2”.
Since listdir returns a list, we may loop through the list to display each file name.

More dataframes
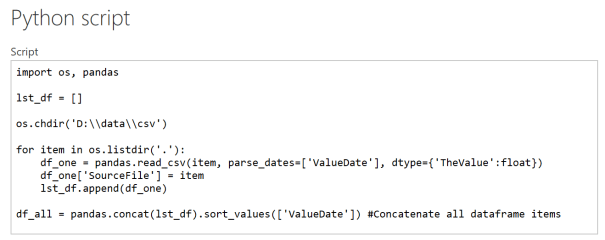
We are going to loop through the files as above and add each file to a dataframe. We use the dataframe head method display the first n rows.

Our first attempt unfortunately keeps overwriting the previous loop iteration so we end up with the last file in the list only. To solve the problem, we are going to create an empty list, then append each dataframe as a list item. Note that the items are of type dataframe.

Our final script above has one critical step and a few desired additions. In the second last line we concatenate all the dataframe items in the list into a single dataframe. Pandas ensures that headers are not duplicated. In addition, we parsed dates & data types and added a source file column.
Power BI Query Editor
For the curious folk, lets take a look at the M code. I stripped comments from the final script to eliminate distractions.
The first thing you will notice as that df_one and df_all are available for selection.

Instead of loading the query, select Edit to open the Power Query Editor window.

Now open the Advanced Editor to have a look at the M script. In the Source step we can see the Python.Execute command which allows us to run Python script.
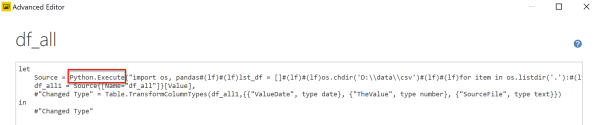
I am still deciding if I am happy or disappointed to discover that Python.Execute accepts a single string parameter which contains the entire Python script. At least I was happy that it was easy to edit. I made a dummy (but valid) change to see what happens.
At this point I was prompted about execute permissions which I suppose makes sense as there is really no control over the content of the Python script.


When you click on Run the Python script is executed again. Click on Close & Apply will take you back to Power BI as usual.
That is it for this post. I’ll continue with Python script for the Query Editor as I see that there is more focus on the Py visuals currently.

This series is building quite nicely. I’ll be adding these tips and tricks to my toolbox that’s for sure.
[…] the previous post we worked with the os (operating system library) to access files. We will use the os library again, […]